An interesting addition to authentication node by p2baron. Check the video of the integration. Source code is available on discord.
Showing posts with label authentication. Show all posts
Showing posts with label authentication. Show all posts
Sunday, October 6, 2024
Fingerprint Reader

Friday, November 17, 2023
Alarm State Machine / Group Zones Example
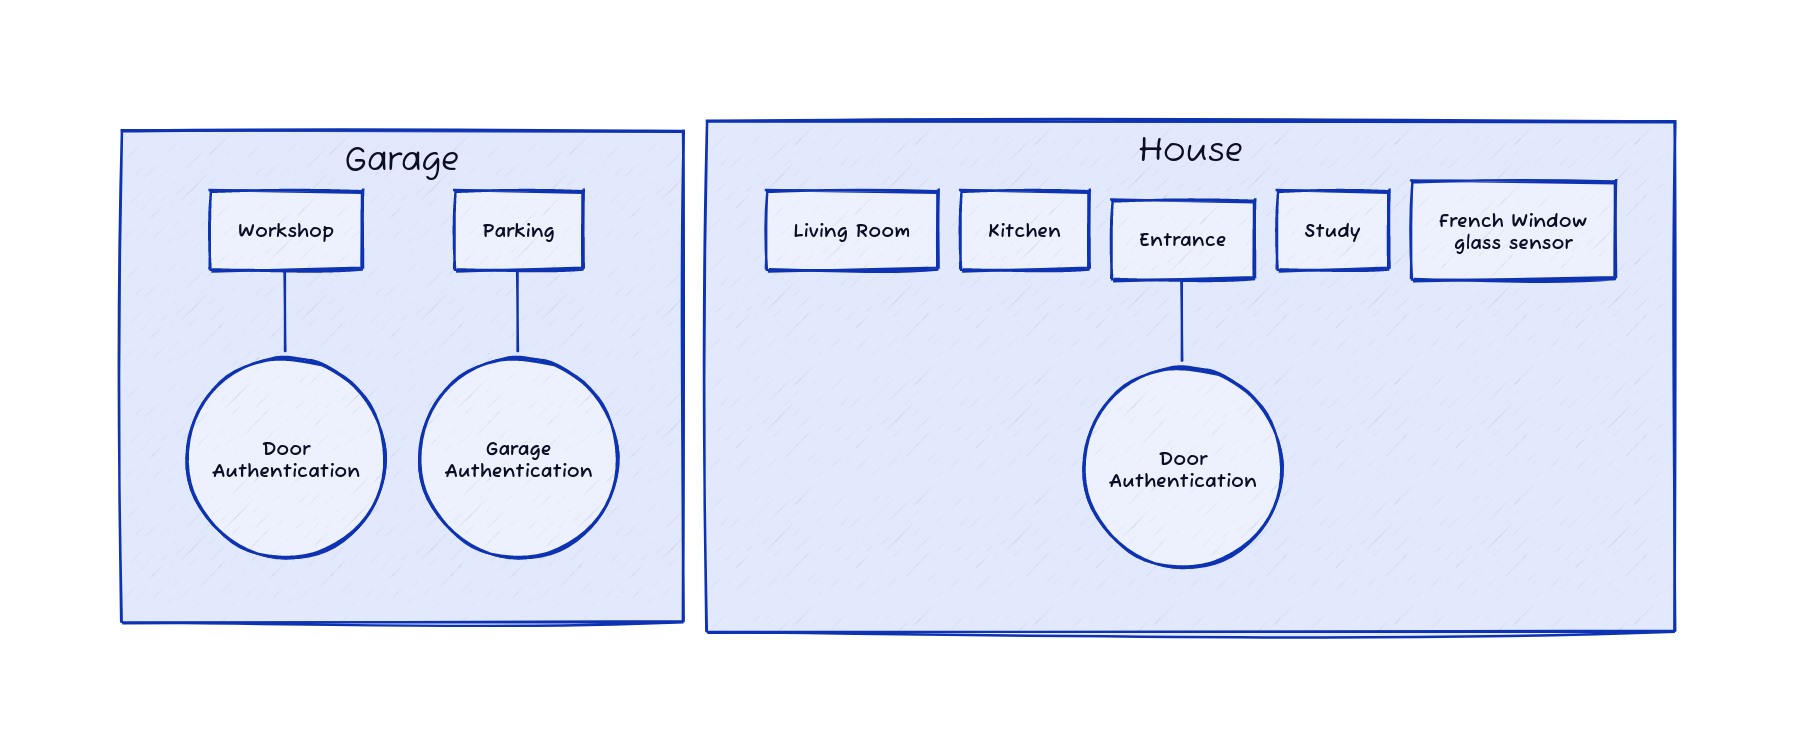
Just to update of gateway configuration page, I've created a state machine diagram showing arm/disarm cycle..png) Also here is an example of my own groups (Garage, House) and zones (PIR, reed) setting for ground floor.
You can see here how authentication unit is attached to particular zone. Only
these zone is then set up with authentication delay. That is, when someone
trips these zones there is time allowed for the person to authenticate.
All other zones in house group trigger the alarm state immediately. You can
read more about it in zone's setting.
Also here is an example of my own groups (Garage, House) and zones (PIR, reed) setting for ground floor.
You can see here how authentication unit is attached to particular zone. Only
these zone is then set up with authentication delay. That is, when someone
trips these zones there is time allowed for the person to authenticate.
All other zones in house group trigger the alarm state immediately. You can
read more about it in zone's setting.
.png)
Saturday, November 13, 2021
Authentication added.

At first I was thinking to use obsolete HTTP basic authentication, to make it simple. But it is very obsolete, and also not supported by vanilla HTTPD from lwip contrib package. I was thinking how to add an authentication for a longer time. There are several methods to be used. First would be creating a single page application with authentication message encrypted in URL as parameters. Witch would require a bigger re-work on the HTML page generation. Now HTTPD has several pages, on which user can set tens of options for each section on a page. Quite a difficult task. Second, to use a cookie to store some secret after user authenticate successfully on browser side, and request the browser to send this secret with each request. But lwip's HTTPD does not support cookies.
Well I deiced for second option. I created a simple patch to HTTPD to handle cookie generation and reception. First is done as part of dynamic header option for pages that are not statically liked, that is not generated via makefsdata program. Then, I added an additional callback, that is preceding request for every fs_open (file system open function). This allows an application to verify received cookie and then, if needed, rewrite the page( or file) requested to something else, for example login page.
I think it is nice and neat addition to lwip's HTTPD, so I will try to push it upstream, hoping it will get accepted.
New pre-compiled version is as always available GitHub, together with all sources. Enjoy!

Tuesday, March 16, 2021
Authentication node changes

This allows gateway to monitor only zones, that you manually setup out of specific group, while in arm home state. This change required also some changes in authentication mechanism. As authentication nodes I offer does not have any keyboard to differentiate between arm home and arm away state, they do it based on time the iButton is connected to the probe. That is, short touch and the group receive an arm away command, while long (over 1 second) touch of the probe, and group receive arm home command.
This working quite well, but after using it for several months I found out that the disarm command also waits for the end of scanning period (1.4 second), trying to recognize arm home / away command. Which had me wondering I put the iButton correctly many times while disarming. Then I realized it does not have to wait for it at all. Simply there is no need, as the disarm command does not differ as arm state. Luckily the node already knows which state the group is in. Realizing all that, I've updated the authentication node sketches and put new version on GitHub. Now the scanning period has two different time values, 1.4 second for arm state, and 0.4 second for disarm state. It just feels more comfortable to disarm if you receive instant feedback.
While on it, I've also updated the set default function, to make it more clear what and where is all set. And then, I've used these changes to propagate values of the elements. Hopefully making it simpler to understand. Feel free to update.
One more small hardware change, I've changed the iButton probe connector and matting PCB connector to JST X2.54, it is much flatter then previously used connector allowing it to fit in narrower spaces.
Saturday, December 8, 2018
Authentication unit over radio
Recently new user of OHS gateway has explored a slightly new way how use authentication units. That is normally until now, the authentication units are desired to be online when main unit is online. This was easily achieved when they were wired nodes with RS485 wired connection. The power and data were going to node over 4 wires, like in any industrial RS485 application. Same 4, or more, wires are usually installed in your house for old authentication units. And it is easy to use them switching old unit to new one.
But what to do in case you have no wires in walls and you want try it without too much construction work. Well, then use the radio as for sensors, right!.
For this reason there is new code example on GitHub. The code is build on RFM69 example, but adds parts of wired node where iButton, LEDs and speaker is used to complete a basic authentication node. I have tested it and it woks quite well without any issue. There were some changes needed in the gateway code, and I will soon post them to GitHub as version 1.7.6.3, along with other tweaks.
Of course there are some drawback over wired connection. It is recommended to have some battery backup for the node as well. That is use the USB node with charging and place a decent 1000mAh, or better bigger, battery. Still it can happen that the gateway is powered from it main 12V supply, and the authentication node battery is depleted and dies. In this case, when you arrive at home at this exact moment, you will not be able to disarm standard way, and you will face system alarm. It is probably not a security concern, but you'll annoy your neighbors a bit until you run to your gateway and turn it off. Thankfully there are two possible solutions. There is possibility to disarm over web interface, but unless you have battery backuped home network, you probably will not be able to do so. But, you can always disarm group over SMS command, this should work as GSM module is in the gateway.
Second problem can be radio connection. As for any sensor, the radio authentication can be out of reach of the gateway. While it is unlikely in normal house, you have to think about having at least RSSI of -75, so you are guaranteed to have room to some unexpected radio noise. It can be easily checked in web interface debug tab, incoming RSSI is reported on any received node packet.
Also, one have to keep the unit powered all the time from at least 500mA USB charger, some older cellular charger perhaps. As the node is not entering any sleep state, nor suspending the radio module, and consuming 20-40mA of power. It cannot be asleep, as it needs listen to receive all radio updates. Rest of power to 500mA is to charge the battery after power failure.
Still I think these small disadvantages can be accepted as trade off for fast deployment.
But what to do in case you have no wires in walls and you want try it without too much construction work. Well, then use the radio as for sensors, right!.
For this reason there is new code example on GitHub. The code is build on RFM69 example, but adds parts of wired node where iButton, LEDs and speaker is used to complete a basic authentication node. I have tested it and it woks quite well without any issue. There were some changes needed in the gateway code, and I will soon post them to GitHub as version 1.7.6.3, along with other tweaks.
Of course there are some drawback over wired connection. It is recommended to have some battery backup for the node as well. That is use the USB node with charging and place a decent 1000mAh, or better bigger, battery. Still it can happen that the gateway is powered from it main 12V supply, and the authentication node battery is depleted and dies. In this case, when you arrive at home at this exact moment, you will not be able to disarm standard way, and you will face system alarm. It is probably not a security concern, but you'll annoy your neighbors a bit until you run to your gateway and turn it off. Thankfully there are two possible solutions. There is possibility to disarm over web interface, but unless you have battery backuped home network, you probably will not be able to do so. But, you can always disarm group over SMS command, this should work as GSM module is in the gateway.
Second problem can be radio connection. As for any sensor, the radio authentication can be out of reach of the gateway. While it is unlikely in normal house, you have to think about having at least RSSI of -75, so you are guaranteed to have room to some unexpected radio noise. It can be easily checked in web interface debug tab, incoming RSSI is reported on any received node packet.
Also, one have to keep the unit powered all the time from at least 500mA USB charger, some older cellular charger perhaps. As the node is not entering any sleep state, nor suspending the radio module, and consuming 20-40mA of power. It cannot be asleep, as it needs listen to receive all radio updates. Rest of power to 500mA is to charge the battery after power failure.
Still I think these small disadvantages can be accepted as trade off for fast deployment.
Thursday, May 28, 2015
Remote unit demo
As you can see in the video I have the unit mounted
next to switches, directly in the wall. I found it very fast and easy
to arm/disarm the group. My 5 year old daughter still finds it funny
after 3 months of use and she ask for my keys to do it.
Friday, January 16, 2015
Web interface - authentication
 Authentication units have their own configuration page as shown on the right. On the top, again, is a summary of authentication units connected to system. The units can be connected by wire(RS485) or wireless(RFM12B). It is shown in the address field. "W" stands for wired and "R" for Radio. Address range is the decision maker here. Units in range 1-14 are wired and 17-143 are connected wireless. Address and type of the authentication unit is defined in remote unit itself. The few options to set is turn the unit On or Off, other is to attach them to certain group.
Remote units are dynamically added to the system at any time by process called registration. This process is activated by service thread few seconds after the system starts, or when you power up any remote units it will issue call for registration. If the unit is present already the system will re-reregister it with new parameters. The actions taken are presented in the log. You can for example see following messages:

If you miss any unit that should be there you can push "Reregister" button and the system will issue registration call.
Going little more in detail, the all the settings are permanently stored in remote units in-chip EEPROM. By default the units register with their defaults, that is not enabled and belonging to group 16. And you have to set them on first. The other settings like functions they provide is dependent on the hardware and is coded in the registration message they sent to main board. Any remote unit can provide more then one function, as you can see on picture above. Unit 1 is iButton authentication unit and also provide ambient temperature.
Subscribe to:
Posts (Atom)