Basic terminology
- Zone is a basic element of your home monitoring system. It covers some physical area of your property and it consists of one, or more, daisy chained PIR, microwave, door or window sensor(s) connected to the gateway. The connection can be done via wires, directly to gateway inputs, or wirelessly via radio (RFM69).
- Authentication unit is a device (node), that is providing arm and disarm actions on defined area. They can be connected via RS485 wired bus, or via radio (RFM69). Authentication unit should be placed inside guarded zone, so that accessing it will trip this zone.
- User is definition of real human who has access to guarded property.
- Key is hash of password provided for particular user. A user can have more than one key defined.
- Sensor is any type of data input node that collects various environmental data. Sensors are not an important part of securing your property, but they may play a significant role in your house automation. They can be connected via RS485 wired bus, or via radio.
- Output is a device that is able to receive data from gateway and perform some action, for example a relay output that can switch light. Outputs are also part of automation rather than security mechanisms. They can be connected via RS485 wired bus, or via radio.
- Node is a device that hosts at least one authentication unit, sensor or output. Nodes can have more than one of each, and can be connected to gateway via wired or wireless connection. Node can also act as remote zone(s), but such node is assigned directly to zones.
- Group is a logical structure combining physical elements like zones, authentication units, sensors, and outputs, together with logical parts like keys and users into one bigger piece. A minimal functional alarm group must have at least one zone, one authentication unit, and one user with a defined key to function properly. A Group can have various states, it can be armed, armed-home, disarmed, or it can be in alarm status.
- Alert is part of messaging system provided by gateway to defined users about system predefined states, such as alarm on group. The delivery of alert notification can vary from SMS to email, or page.
- Timer is part of automation provided by gateway, and it can be used for running an action at specific time interval. There are two basic types of timers. One is period based timer, that repeats itself on defined time intervals like seconds, minutes, hours. And a calendar timer, which is more suitable for day in a week types of tasks.
- Trigger is also part of automation service. It can be used to run an action triggered by state of sensor, zone or group.
- Script is basically a set of TCL commands that are executed sequentially, and then the result is evaluated. Script can be used as a condition to evaluate to run a timer or a trigger.
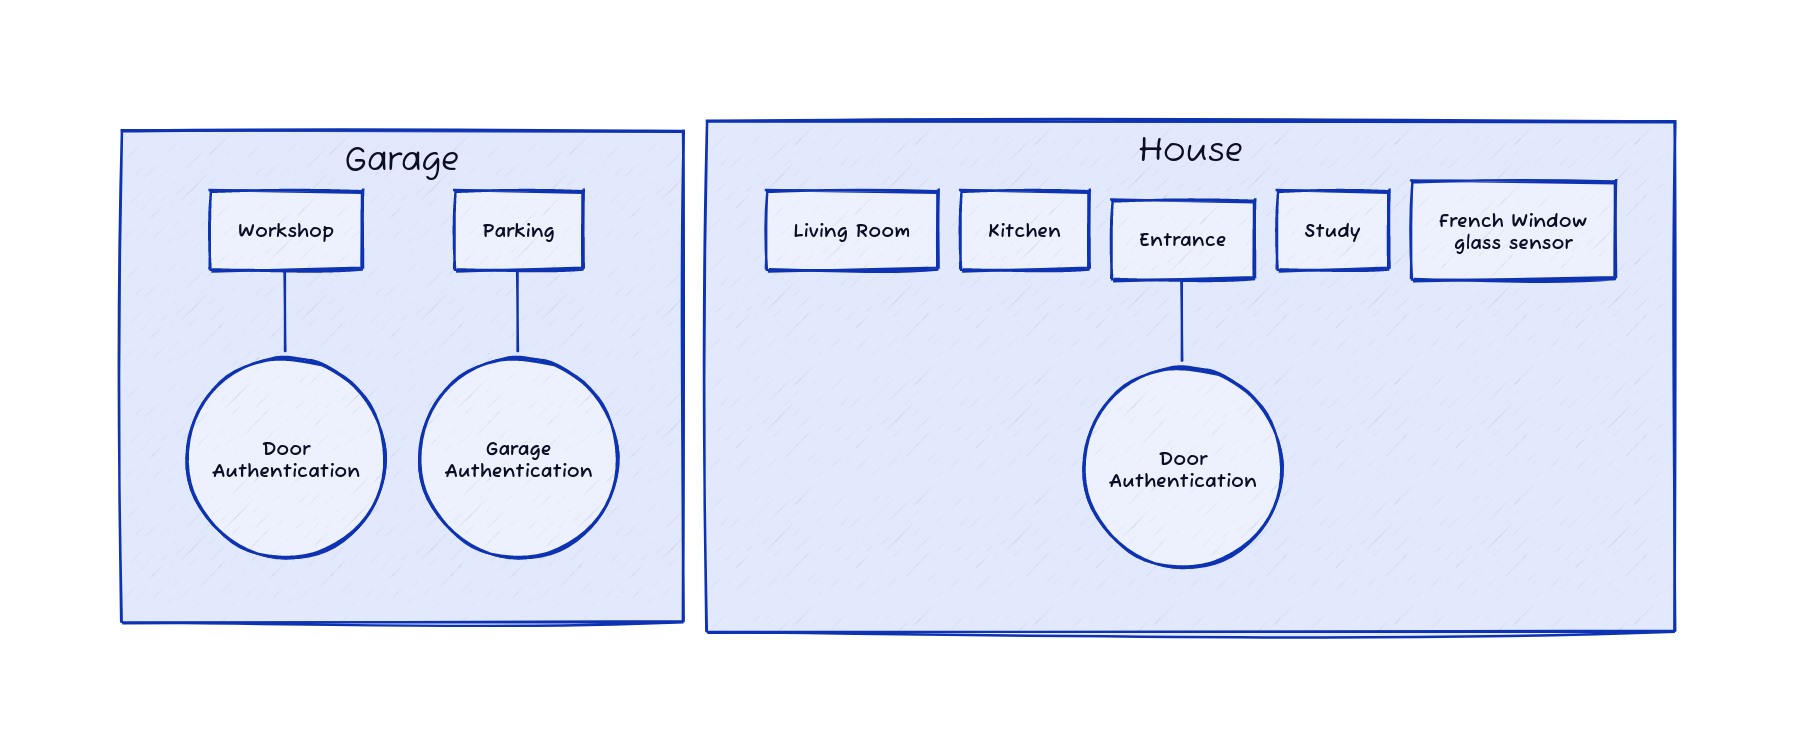
Group vs. Zone Example:
.png)
Alarm state diagram:
.png)
Shell interface
- boot - reboot gateway to DfuSe firmware upgrade mode.
- date - allows to display and set date and time.
- debug - redirects debug console to USB port.
- info - information about gateway and firmware.
- log - displays gateways log entries.
- network - current network interface information and lwip flags.
- ubs - status information about uBS FRAM storage and also uBS format.
- threads - information about system threads and their statuses.
Web interface
Web interface is protected by credentials. Default are user: admin, password: pass.
 | HomeHome a landing page when you open the gateway web interface. It shows information about current system time, start time and calculated uptime since last reset. Additionally it presents information about AC power and main backup battery. When the gateway is connected just by 12V power supply, it shows that AC power is off and it runs on battery only (PSC35A-C with 4 wire connector is needed for full UPS like support, see the store). Next is voltage of RTC (CR2032 3V lithium non rechargeable coin cell) that powers real time clock and backups system configuration setting. This voltage is required to be greater then 1.65V, but better replace the standard 3V lithium cell when it is below 2.6V. Attention needs to be paid to the cell polarity, there is + sing on PCB, and on the holder as well. Replace it only when gateway is powered on, otherwise all setting is lost and gateway will restart to initial default setting. Modem section shows information about modem type, whether it is powered On and alive, that is responding to AT commands. Next is a registration icon that presents one of the following statuses: searching, unknown, registered home, roaming or denied. Following line is a signal strength indicator in percentages. Then system information line, that shows various information provided by GSM module, description can be found in SIMCOM documentation. Button Load defaults loads the initial values and replaces all user entered configuration. Save button save the user defined configuration data to battery backup-ed SRAM. |
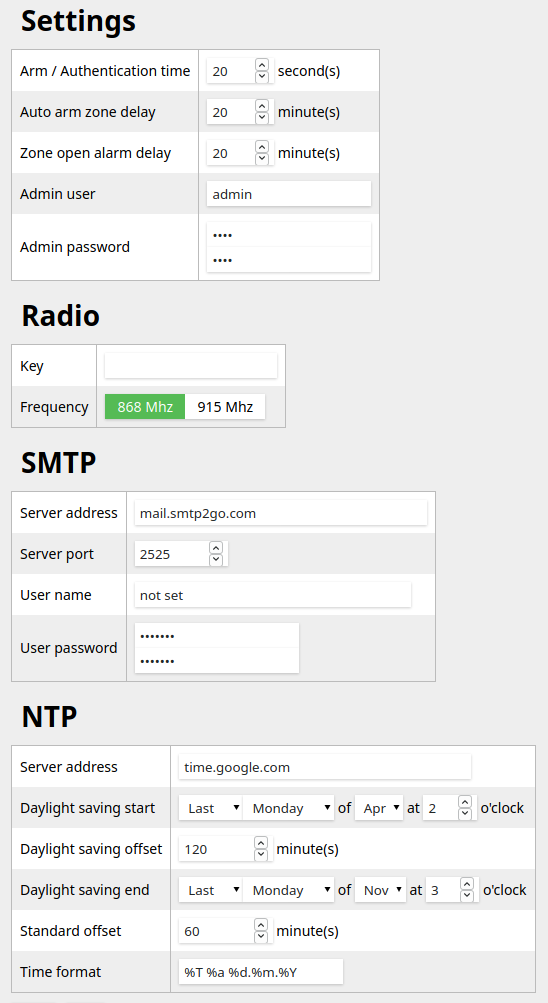 | SettingGateway settings page allows configuration of important and global parameters. The Settings section contains Arm / Authentication. This time is a delay that is given to the user to leave a zone that is being armed. Also, it is a delay, a user is given to authenticate when you enter an already armed zone. Authentication time is further expanded in every zone as a separate attribute called authentication delay, as multiplier 0 - 3 to this base time. Auto arm delay is a time base for groups to become auto-armed. Group becomes auto-armed when an auto-arm is enabled for a particular group, and there is no activity in any zone of this group for a given period. It is meant also as a safety feature, for example if users are forgetting to arm group on leave. Open alarm is a time base for feature that reminds user(s) that zone is in alarm state for longer then specific time. This can be used, for example, for a reed switch sensor on your back door or garage, to remind you that you left it open. Open alarm has to be enabled separately in every zone that should be monitored, and the gateway will issue a notification alert. Radio section allows to insert radio encryption key. Such key is then used to provide AES128 encryption of all radio packets. Key must be exactly 16 characters long. My personal guess is that there is no real need to use encryption, as it needs a lot of knowledge and some special equipment just to even eavesdrop the communication. Then you learn that you monitor packets that carry the temperature of some sensor. But it is surely based on real use cases. Radio also offers frequency switch by software to 868 or 915Mhz. SMTP section contains configuration for email alerting. Where server address is DNS name of SMTP server. mail.smtp2go.com is the default address of service offered by smtp2go.com. They have free plan service for 1,000 emails per month or 25 emails maximum per hour. That is sufficient for any standard usage for a single gateway. Server port is enumerating destination SMTP server port, here again default value to smtp2go.com service port 2525. User name and user password are then your credentials used to authenticate to SMTP service. Credentials are send as Base64 encoded. NTP section holds configuration for Network Time Protocol. Server address can be left to default google's NTP server, or better yet provide some local server address. As NTP provides time in UTC, you need to provide daylight saving start and offset in minutes from UTC. Similarly daylight saving end and offset in minutes from UTC is needed to switch the time of gateway back to standard time. Time format represent the date and time in respect of strftime expanding its format specifiers into the corresponding values that represent the gateway time. Time can be also set manually via shell interface. |
 |
ZoneThere are two types of zones based on location, local zone and remote zone. Local zones are directly connected to gateway inputs via wires. These can be built in balanced or unbalanced zones. Remote zones can be connected either by wire (RS485) or wirelessly (RFM69) via registration mechanism. Further remote zones can be divided into two groups by the way they do its reporting. One, standard remote zone, would report fully all state changes. That is, it will report every change of state like OK, PIR or Tamper. The other, battery powered remote zones, will only report alarm states such as PIR or Tamper. Gateway will then automatically change the zone state back to OK, if there is no event received for 2 seconds. This mechanism is implemented to prolong battery lifetime on such powered zones. The zones can be also divided by input to balanced and unbalanced zones. Balanced zones need a pair of resistors on the end of wires, and allow three different states to be signaled back to the gateway. Also such a sensor is much less prone to be tampered by. Usually you want all your PIR or microwave sensors to be balanced. Unbalanced zone reports only OK or alarm state, and are suitable for door/window sensors, which do not need balancing resistors. Zone settings are shown on picture. You can give a zone a friendly name and set it On or Off at any time. Arm home swing lets you set the zone to be monitored when group is set in arm home state. Open alarm is enabling the zone monitoring when zone is in PIR state for some predefined time (timebase is set in setting tab). Such a feature reminds you that the zone is in an alarm state for longer than a specific time. This can be used if you have reed switch sensor on your back door or garage and you keep it open. Alarm as tamper forces the zone alarm state to tamper state, it is useful for some zones that needs to be trigger alarm even when group is not armed. Like smoke or flood sensor, and it is set by default for the enclosure tamper contact (zone 11). Balanced switch allows you to force balanced input into unbalanced one. But only if the zone input allows it. Authentication delay is zone setting for authentication time multiplier for given zon (timebase is set in setting tab). Put it clear, it is time that the gateway waits when the current zone is tripped. For the entry door sensor you will set it to 1~3, based on how much time you need to reach the authentication unit. For your window zone, or inner house PIR sensor you will set it to 0, since the gateway does not need to wait for authentication when someone enters your house through the window. Group assign zone to specific group. |
 |
GroupA group combines multiple elements into one object. Such objects are zones, authentication units, sensors and contacts. It allows, for example, to set different alarm settings for your house and for your garage. Then your garage can be armed and monitored while you are present in your house. In the groups tab on the web interface you can see what zones, authentication units and sensors belong to which group, and what contacts are informed about group events. The group itself does not have too many settings. You can set the group name, set it On or Off and assign an output of gateway relays to trigger PIR and tamper events. Group can also have an auto arm capability. Auto arm scans all zones in a group for latest motion. That is, if there is no one moving in any zone in a group for a given period (timebase is set in settings tab), the group will become auto armed. Last two settings are group chained arming or disarming. This feature allows automatically arm or disarm other groups while arming/disarming the group manually with a key. You can configure the group to select another group to do the same, i.e. chain multiple groups together. It can be useful to automatically arm Garage when you arm House. This is set separately for arm and disarm. Even the chain can be made as a closed cycle, that is House -> Grage -> Barn -> House, this way anytime you arm one of these three groups all will become armed. When you do not need any chained group you leave it set to 'not set' All other parameters are taken from their respective sources like zones, sensors and such. But group setting offers a great overview of what is going on in your system. You can see the group status, if it is armed or alarm is tripped and so on. There are 10 groups present, not only to differentiate zones, but also to distinguish location of sensors and to allow proper propagation. When there is new element(zones, authentication units, sensors and contacts) it is automatically added to dummy group, ie not shown on group overview.Knowing this, create your groups by enabling them, then name them and assign them relay(siren) outputs. There are two relay outputs for 2 sirens, usually one outdoor and one indoor. OUT setting allows you to make combinations for different alarm and tamper events or groups. |
 |
UsersUser tab lets you define basic information about people accessing your secured area. Each user is defined by its index and name. Users can be also easily disabled by on/off switch. A user's phone number number is important, as it can be used to send SMS or a page in case of an alert. Same number is also used as authorization when the user sends SMS commands back to the gateway. Similarly users email is used as an address for email alerts. Global switch assigns users to all groups of your system. This is contrary to assigning the user only one selected group. If so, it is then disallowing the user to arm/disarm other groups, and also such users are not informed about any alert in such groups. |
 |
KeysKeys tab is quite simple, yet a very important part of setting. It holds keys (passwords) for each individual user. Users can have more than one key defined and attached. Keys are not stored themselves, but gateway stores only hashes of the keys. This allows other then standard iButton authentication units to be easily connected to OHS authentication mechanism, and allows them to provide keys longer, or shorter, then 8 bytes. Keys are handled by its index, and every valid key must be assigned to already existing users. Also each key can be enabled or disabled by on/off switch. Hash value is directly editable. To obtain a hash value for a new key (password), simply touch or enter a new key (password) to any enabled authenticated units. Then this new key is recognized as unknown and the hash is stored in log entry. |
 |
AlertsAlert is a mechanism the gateway uses to inform all defined and assigned users about various system states. Each state is described by its name, and the toggles tell the gateway which alert mechanisms should use for each state. SMS simply uses the user telephone number and sends an alert description as SMS text to each predefined user. Of course assuming the GSM modem is up and connected to the network.
Page takes telephone number and rings it for 20 seconds, then hangs up. It is an efficient way to inform you about urgent alerts along with SMS, or as a separate alert. But it is meant only for high importance alerts, since it needs to wait for GSM modem to dial, ring and hang up. It is processed at last in the alerting mechanism, and blocks processing of alerts for a long time, especially when there are more then one telephone number to page/call. Email alert sends email to predefined users. I have been thinking about what would be easy to achieve for me, but also for other users. And although I have a small server running at home, I have opted for service available for free online. I have found a nice service offered by smtp2go.com, they have free plan service for 1,000 emails per month or 25 emails maximum per hour. That would be sufficient for any normal usage for a single gateway. No fancy text is sent through email, just subject with the same info as for SMS, and it is sent to all recipients that match the triggered alert. It works fast enough and is quite efficient methods for alerts that have less importance. |
 |
NodesNodes, in gateway configuration terms, are logical structures providing remote inputs or outputs to a gateway. Physical node can host at least one logical node. Such logical node can be authentication units, sensors or outputs. Physical nodes can have more than one of each, and can be connected to gateway via wired or wireless connection. Nodes can also act as remote zone(s), but such nodes are assigned directly to zones. Nodes are defined by the address as primary identification like W:1:K:i:0. This address is embedded into the node firmware and the gateway receives this address as part of the registration message from the node. For example W:1:K:i:0 stands for: W - wired : 1 - wired bus address : K - key (authentication) unit : i - iButton key : 0 - node local address. Node name can be defined by user, along with enabling such nodes and setting the MQTT publish functionality. Next important item is assignment to the group which is very important for authentication units. All these parameters are sent back to the node with every change, and the nodes store these changes in its memory. Nodes are registered to the gateway dynamically, which means when you start gateway you will usually see an empty node tab. It may take some tens of minutes until all nodes, especially battery powered, show up and register with gateway. Authentication unit. Every group needs to have at least one authentication unit to disarm and arm it. I wrote disarm first as the group can become armed by itself , or tampered. When the zone is tampered it forces its superior group to alarm state and you will need to disarm it. Sensors are nodes that provide read-only data to the gateway. It is usually not needed for the security part of the gateway, but rather used for various automation or environment data collection that can be passed upstream. There are some basic defines in firmware already, like iButton, Temperature, Humidity, Pressure, Voltage, Battery, Digital, Analog, Float, TX_Power and Gas, while others will be marked as Undefined. Outputs are nodes that are able to receive data from gateway. Let it be digital output like relay, or analog type like fan speed. They are also part of automation rather then security mechanisms. However with new functionality called scripts, you can make them be art of security triggered actions. |
 |
LogThere is not too much to say about log, it simply does what one would expect, that is to allow the user to list through the log entries. Currently there is 64kB storage in FRAM used for logger. Each log entry is exactly 16 bytes long, out of that first four bytes is encoded timestamp, and the last 1 byte is left for bit flags. This is leaving 11 bytes to store the message. Messages are not free text, but encoded by type and sub-type. It is done to be at least a bit human readable, for example, major type S means all system messages. Gateway firmware provides a global function decodeLog() that decoding log entries to text form. |
 |
TimersTimers is an automation feature, as the name suggests, it allows to manage time dependent actions mostly on remote nodes outputs by schedule. There are 10 separate timers present, with overview present in table, and setting of timers is in the picture. Timers are divided into two different categories. One is called Period and the other Calendar. The main difference between them is how they handle days of week. Calendar based timers can run only once a day, at any given start time you provide. And also, you can select what day or days of week it will run. Period timers will run repetitively at every period starting at a given start time. Period time can range from 1-255 seconds, minutes, hours or days. Both of types of timers have in common run time setting, that specify the time between On and Off signal to remote nodes. It again ranges from 1-255 seconds, minutes, hours or days. All settings for timers are shown on the picture. Every timer can be identified by name, and can be turned On or Off at any time. There must be some caution when turning Off timer that is triggered, it might prevent the gateway from sending the Off signal to the remote node, and it will be left On. Then there is the mentioned Period and Calendar switch, and later on seven switches for every day of Calendar timer. These day switches have no functionality for Period timers. Start time on the other hand has meaning for both, Calendar timer will trigger exactly on this given time at any selected day. Period timer uses the Start time as offset of its first calculated period interval. Period time is the desired scheduled start for period based timer. And Run duration is the desired scheduled end for both types of timers. Address selection lets you assign any node in your wired or wireless network that is capable of output function. It can be "not set", and the timer can be used as a global flag for other automation tasks. Constant On and Off are the values that are sent to such nodes at start and stop time. |
 |
TriggersTriggers is an automation feature that performs action or events on groups, sensors or zones. There can be up to 10 triggers created that can do various tasks or react on group or zone state, or sensor value. The setting of each trigger is shown on the left. You can assign names up to 15 characters for each trigger and turn it On or Off. Important is trigger type which lists all available sources, that is the sensors, or groups and zones numbers. Condition and value are describing when the trigger should happen. Put it simple, it is "if ... then" in code. There can be "=","<>","<",">","Any", that is equal, not equal, less than, more than or any/always. Value is a float number that the condition is compared to, except for symbol "any" that is processed always. Hysteresis is the value to smooth constantly changing values. Let's say you want to turn the fan on when humidity is 55%, and you'll set Hysteresis to 5%. The actual on will be then sent at 55+5 and to Off signal at 55-5. Evaluate script selection allows you to assign an existing TCL script which result must be non 0 to perform the trigger. Then there is an alert flag, it means the trigger event is passed to the logger, which can then send any alert like SMS or email, based on the logger setting. Pass flag indicates that when the event is triggered, the gateway will pass the value to the sensor with the given address. Pass value or constant switch is deciding if a trigger source value is passed to destination address or the constant present in Constant On and Constant Off. Pass "no", "yes", "once" flag indicates how often the value is sent to the destination. Pass once is preventing subsequent sending of values for the same trigger condition, and it is reset only when the condition is negative. Pass Off "no", yes", "timer" is indicating if the gateway should send off a message to the recipient after the condition is negative. Off timer allows the user to set a specific timer period for each such trigger. Address is the destination to which will gateway send the trigger. It can be "not set", and the whole trigger can be used as a global flag for other automation tasks. With triggers you can dynamically assign many events that can help you improve your home automation directly in a friendly web interface. For example there can be a trigger to send SMS or email when the battery is reaching low level on my meteo station. Or another trigger will turn on light whenever there is a PIR sensor triggered on a zone called stairs. Simple as that, and it just works! You can create many other scenarios for triggers, such as simply passing data from one sensor to another. I have in mind passing external temperature and humidity to internal temperature and humidity sensor that turns On/Off fan in the bathroom. This way you can compare the two values and make better decisions. |
 |
ScriptsTCL
scripts is a new functionality in OHS 2.x. They allow various enhancements to be added by users to the automation part of the gateway. As the base of TCL language I used the following library: https://github.com/zserge/partcl, and embed it into gateway firmware. Scripts are handled by a separate thread that has a queue that serves all incoming scripts, and passes the result back asynchronously as a call back. Scripts are using their own separated heap stack, provided by umm_malloc library, that performs great stack management. Embedded SPI FRAM is used as storage for scripts with 64kB of available space. I have written a simple block access
library called uBS (micro block system) that allows basic read write operations. Scripts also have their own tab in the web interface, which allows you to create and run the TCL scripts directly on the gateway. As shown on the picture, there is statistics about the heap and the storage used by scripts. as well as helper icons </> and #. The </>, when you hover over it, shows build in language helps. And the # shows all variables currently in heap with their values. Button "Run" passes the edited script into execution queue. "Refresh" button simply refreshes the page, allowing the "Last output:" to be seen. "Save" stores the script with given name to uBS storage, and allows this scripts to be assigned to triggers and timers. Due to performance limitations, since scripts are not primary function of the gateway, there are build in limits to maximum script execution time, and maximum script interactions. |
.png)
.png)
No comments:
Post a Comment